
Draft it Help System
The complete Help system for Draft it is available on these pages.
Available in: Architectural Only
General
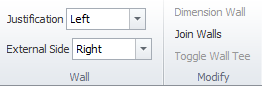
When a wall is selected its entity handles are displayed. Once you have a number of editing choices.
Obviously the wall can be Deleted, simply press the
 key. You can also modify the properties
of a wall using the Properties Explorer and Status Bar. You can change the Layer that a wall is inserted on to, if you want to change any
of the line colours of the wall you must change the colours assigned to the various wall layers.
key. You can also modify the properties
of a wall using the Properties Explorer and Status Bar. You can change the Layer that a wall is inserted on to, if you want to change any
of the line colours of the wall you must change the colours assigned to the various wall layers.
A wall has three entity handles, one at each end (blue) and one at its centre (red). These 3 points can be on either wall face or on its centre
line, this depends on the wall 'Justification'. 'Move the cursor over any of the handles and its colour changes to yellow then
simply click to select it. If selected the major handle (red) attaches the whole wall to the cursor allowing it to be moved to a new position and
clicked into place using any of the snaps and input options. (Alternatively select the
 Move command.)
The minor handles at the endpoint's define the start and end positions of the wall. If one is selected it is attached to the cursor and its
position can be moved to a new position and clicked into place using any of the snaps and input options, the other minor handle remains in place.
Move command.)
The minor handles at the endpoint's define the start and end positions of the wall. If one is selected it is attached to the cursor and its
position can be moved to a new position and clicked into place using any of the snaps and input options, the other minor handle remains in place.
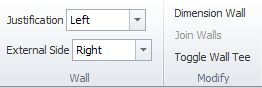
Corners
Draft it Architectural automatically tidies wall corners as walls are drawn but can also tidy corners whilst modifying/moving walls. The key to this is the individual wall handles. The blue handles at either end define the controlling points of the wall. If you move the handle at the end of one wall onto the controlling point of another wall the resulting corner will be tidied, see below. The tidied corner will trim correctly providing that the wall faces match i.e. the external faces are both on the outside or inside of the corner. Alternatively to form a 'tidied' corner the 'Join Walls' option can be selected on the ribbon.
This option becomes available when 2 walls are highlighted.
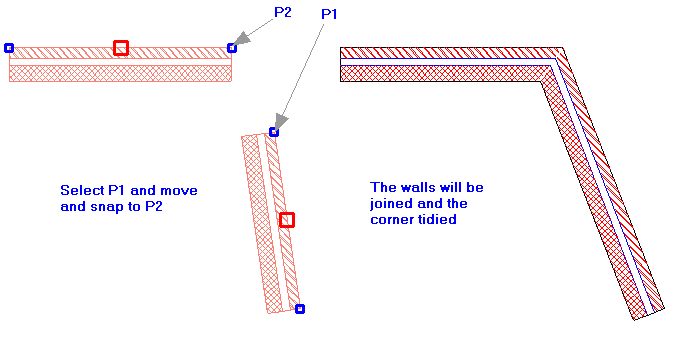
TIP: If you wish to join two walls to form a corner simply extend the walls so that they meet in the corner.
TIP: If the corner does not appear to be tidied correctly click on the
 Refresh button.
It maybe that the display needs to be updated.
Refresh button.
It maybe that the display needs to be updated.
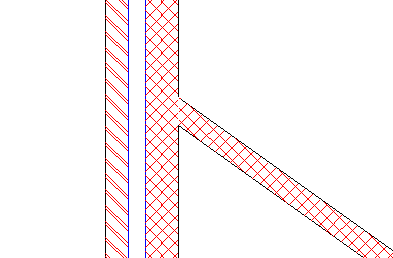
Tees
When a wall end is placed anywhere along the length of another wall Draft it Architectural will trim the wall back to the nearest face of the intersecting wall. In most cases the wall face at the intersection point would not be trimmed except where a where the leaf types matched (see the blue circle below). You can override this 'trimming' on any end of any wall.
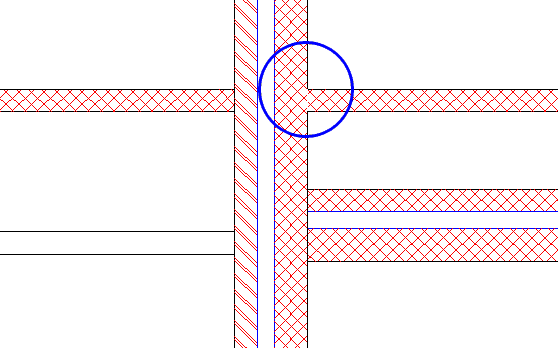
Typically the wall would be teed in at the Perpendicular point of the intersecting wall, although the teeing in position could be anywhere along the wall regardless of the tee angle. See the example below.
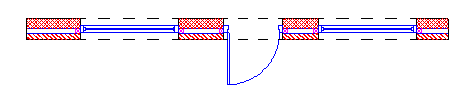
Door/Window/Opening positions
When the length of a wall is changed any doors/windows/openings will remain in the same position**. This will be the case even if the change
to the wall length results in a door/window/opening partially overhanging the wall end or being completely outside it.
** The exception to this is if the change to the wall length also changes the angle of the wall. In this case any doors/windows/openings
will remain in the same position (distance) relative to the 1st end of the wall. (The first end being defined by the order in which the wall
points were drawn.)
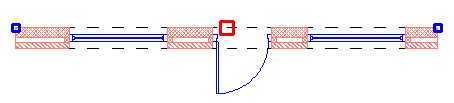
Adding Wall Dimensions
When any wall is selected it is possible to automatically add dimensions to each wall section and any openings along the entire length. Simply click on the 'Dimension Wall' option in the ribbon. For example the all of the dimensions for the wall below can be added in one operation.
Select the wall to highlight it.
Now click on 'Dimension Wall'
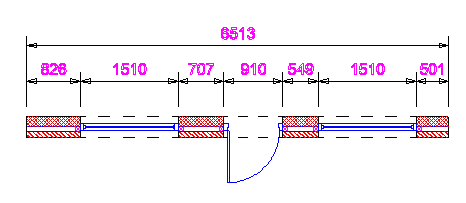
Draft it automatically calculates all of the dimensions for the wall and allows them to be placed with a single click. Each are standard individual linear dimensions and can be Modifying or Moved in the same way as any other dimension.