
Tutorial 2 Part 9
Available in: Free, Plus, Pro, Architectural
Next we will construct the hob. Select Zoom Window  and select the area shown here.
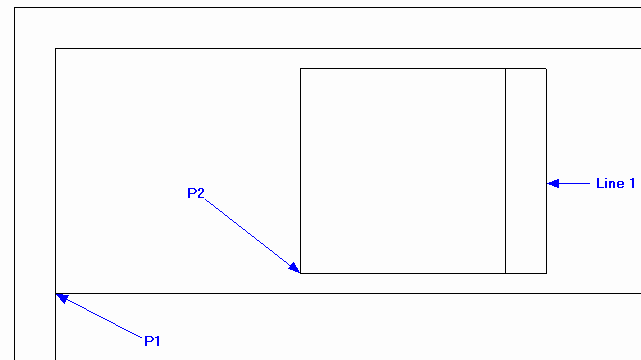
Select the Rectangle button  and go Relative to P1. Type '600' and
  and then '50' and , this is the first corner of the rectangle and then type 600 and and then '500' and and the rectangle will be drawn.
Select the rectangle so that its entity handles are displayed and click on the Explode  button, this will convert the rectangle to individual lines for the next step.
Now select the Offset button  and click on 'Line 1', drag to the left and type '100' and .
Now to create the buttons and rings. First select the Circle command  to draw two circles, then we will use Offset and Copy to create the rest.
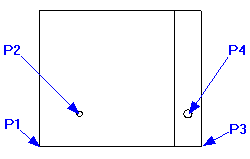
Go Relative to P1, type '150' and and then '120' and . The radius is 10 so the quickest way to set this is to use Arrow Key Input. Simply press any one of the four arrow keys and type '10' and press . Select Repeat the circle command and go Relative to P3, type '-50' and and then '120' and . To set the radius as with the last circle, press any one of the four arrow keys and type '15' and press .
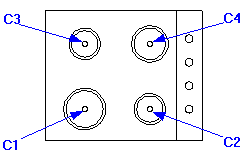
Click on the circle at P4 (the entity handles are displayed). Select the Rectangular Array button  .
.
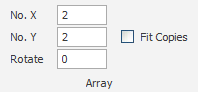
Before indicating the reference point you will notice that the Ribbon has changed and now displays the specific options for this command. Change the 'No X.' to 1 and 'No Y.' to 4 and pick the centre of the circle (P4) as the reference point.
The four circles we require are 90 apart, so the 'point to array to' is a point '0' in X and '90' in Y from the circle centre. The quickest way to define this is to press the  key, type '90' and press
  .
.
Select the Rectangular Array button again and click on the circle at P2 (the entity handles are displayed). Now set the 'No X.' to 2 and 'No Y.' to 2, pick the centre of the circle as the reference point. This time as we have more than one item in both X and Y the easiest to define the next point is to use Direct Input, Simply type '250' and press for the X value and then type '250' and press for the value as well.
Now use the Offset command to offset circles 'C1' & 'C4' each by 70 and then by 80. Then offset circles 'C2' & 'C3' each by 50 then by 60. Remember the easiest way to define each offset value is with Direct Input, simply type the value and .
The hob is now complete and should look like the picture shown.