How To The Program Interface
Draft it Button Quick Access Toolbar System Toolbar The Ribbon
Home Ribbon Page Architectural Ribbon Page Symbols Ribbon Page Views & Settings Ribbon Page Command Specific Ribbons Minimise/Expand the Ribbon
Properties Explorer Layout Explorer Drawing Tabs Command Window Status Bar
Tutorials
Part 4 - Drawing the Roofs

Available in: Architectural
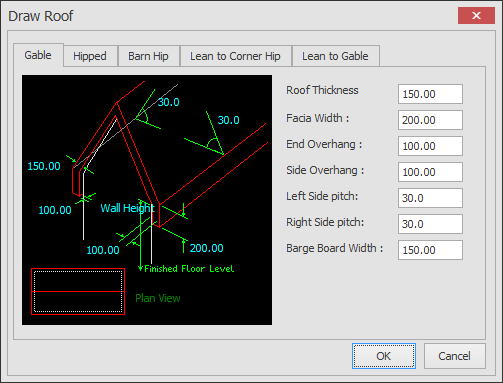
First of all we will draw a gable roof over the first floor plan. Select the roof button Roof button and make sure that the 'Gable' tab is selected .  Click 'OK' when the settings match those below.

gable roof dialog box

The prompt now reads:

Indicate wall line that roof is on:

Select the topmost horizontal wall at the position (1) in the picture below.

The prompt now reads:

Indicate first corner for width of building:

Select the End point snap at the top left corner as shown (2). The prompt now reads:

Indicate second corner for width of building:

This next point defines the other end of the gable, however it can't be picked directly as it is a point along the the left vertical wall which is in line with the external face of the front door wall. To pick this point we will use X Snap and Y Snap feature. Move the cursor over the End point at position (3), DON'T CLICK, hit the y key key and move the  cursor toward position (4). You should see a dynamic dotted line drawn horizontally from position (3) to the cursor. Now simply move to the End point at position (4) and click. The prompt reads:

Indicate corner for length of building, or [T]ee to join existing roof:

We are now going to indicate the length of the roof. Pick the End point at position (5).

gable roof pick points

The roof over the main body of the house should now appear with the ridge running horizontally across the plan.

To make the selection of the correct points easier zoom into the area shown in the picture below the dialog box (the furniture has been switched off for clarity).

Re-select the roof button Roof command and in the dialog box make sure that the 'Hipped' tab is selected and adjust the settings to match those below. Select 'OK' to continue.

hipped roof dialog box

Pick the wall to place the roof on position (1). (Again take care not to select any of the windows when selecting the wall). Now using the End point snap select two corner points (2) & (3). The roof will be teed in so press thet key key and click on the existing roof line at position (4) and the first hipped roof section is drawn.

The last section of the roof to draw is that over Bedroom 4 below (again the furniture has been switched off for clarity). Zoom into this area and once more select the   roof button Roof button again.

The process is the same as that we have followed on the previous roof section. Make sure the 'Hipped' tab is selected, there should be no need to adjust any other settings, before you select OK'.

Select the wall at position (1) and using the End point snap select two corner points (2) & (3). Again we must indicate the roof to tee into, so press the t keykey and  click on the existing roof line at position (4).

second hipped roof pick points

With the furniture layers switched off the first floor plan is shown below.

finished roofs

Do you have a question?

If you need help deciding which of our CAD systems is right for you.
Or maybe you need to chat about our bespoke development service.

Call us, email us, we are here to help.