
Draft it Help System
The complete Help system for Draft it is available on these pages.
Available in: FREE, Plus, PRO & Architectural
Now we will add the two windows. Use Zoom Window
 to close in on the top right hand quarter of the room.
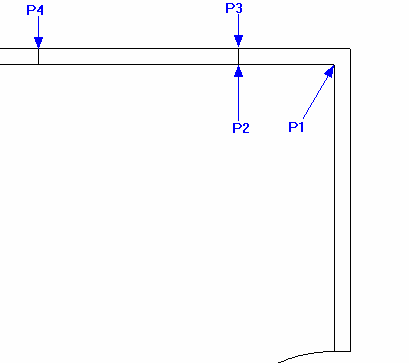
Select the Line button
 and go Relative to P1. Now using
Direct Input type -600' and press
and go Relative to P1. Now using
Direct Input type -600' and press
 (this is the X value), now type '0' and
(this is the Y value). Move up and snap to the 'Perpendicular' point on the line directly above at P3.
(this is the X value), now type '0' and
(this is the Y value). Move up and snap to the 'Perpendicular' point on the line directly above at P3.
Now select the Offset button
 . Click on the line just drawn, drag to the left and type
'1250' and press
, as the
Offset command needs only one value the
Direct Input feature of Draft it accepts this and completes the offset.
. Click on the line just drawn, drag to the left and type
'1250' and press
, as the
Offset command needs only one value the
Direct Input feature of Draft it accepts this and completes the offset.
It might be a good idea to Zoom closer in around the two new lines.
Select the Line button
again and go Relative to P4. Type '0' and
, now type '-40' and
. Move to the right and snap to the 'Perpendicular' point on the first
line between P2 and P3.
Now select the Offset button
again. Click on the horizontal line just drawn, drag down
and type '20'.
The window is complete and should appear as shown below.
