
Draft it Help System
The complete Help system for Draft it is available on these pages.
Available in: FREE, Plus, PRO & Architectural
We will use the Offset command a few more times to create a few more lines.
Select the Offset button
 again and the prompt reads:
Give Line/Arc/Circle to Offset:
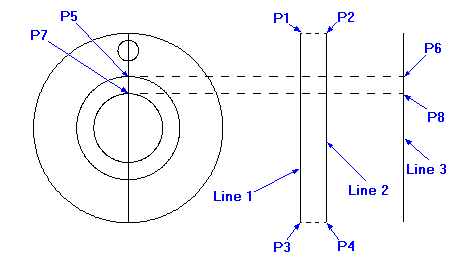
Select the 'Line 1' shown in the diagram and the prompt now reads:
Give Point to Offset To:
This time move to the right and use the dynamic dimension to set new offset Distance
as 15mm ('Line 2').
If the value is locked from the previous input either click on the lock button  next to the Snap button
 or just type in 15 and press enter
Repeat the Offset command again and repeat the above using 'Line 1' as the line to offset at a distance of 60mm to the right (Line 3').
Now we will draw some lines, for clarity in the picture here they are shown as dashed lines. Select the
Line button
 . Draft it has remembered that the
Snap button
input option was set when drawing the last line so there should be no need to alter the input setting.
. Draft it has remembered that the
Snap button
input option was set when drawing the last line so there should be no need to alter the input setting.
Firstly draw two lines between the 'End' points at 'P1' & 'P2' and
'P3' & 'P4'. (Remember after drawing each line right click the mouse twice, firstly to stop drawing lines, secondly to call the line command again).
Now draw a line from Quadrant point (P5) to the perpendicular point (P6) on line 3.
Next draw a line from Quadrant point (P7) to the perpendicular point (P8) on line 3.