
Draft it Help System
The complete Help system for Draft it is available on these pages.
Available in: FREE, Plus, Pro Architectural
This section will help you to understand some important things you need to know about how to use Draft it. It’s a good idea to read through this section whilst referring to the software, before embarking on your first drawing.
USING YOUR MOUSE
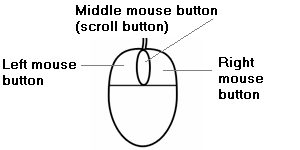
What can I do with the Left Mouse Button ?
DRAWING
Unlike other drawing packages you may have used, when drawing anything in Draft it, you must click and release the left mouse button to place the start and subsequent points of whatever you are drawing. Do not hold down the left mouse button and drag because this will not work.
SELECTING INDIVIDUAL ITEMS
You can select an individual item by clicking on it with the left mouse button. For more information see Select Items.
SELECTING MULTIPLE ITEMS
You can select multiple items by holding down the Ctrl key on your keyboard and clicking with the left mouse button on every item you wish to select. Alternatively, you can select multiple items by holding down the left mouse button and dragging the cursor so that all the items you wish to select are captured inside the rectangle which appears Select Items.
What can I do with the Middle Mouse Button (Scroll Button/Wheel)?
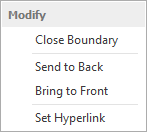
If an entity is selected then a single click of the middle button displays a pop-up menu as shown below*.
*If the selected entity already has a hyperlink added to it then this link will be displayed for selection in the above pop-up.
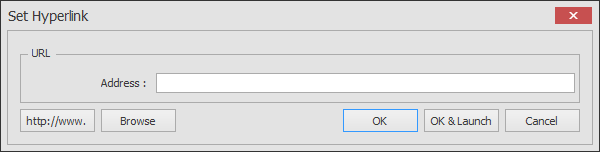
HYPERLINK
If selected then you can set a link to a file or website using the following dialog box.
SEND TO BACK/FRONT
Draft it allows you to control the order of the entities in the drawing (the drawing order). This means you can select an entity and move it forwards or backwards (in the system display list) thus controlling which item appears on top should entities overlap. Firstly it should be noted that all lines, arcs, polylines, text, dimensions etc. are always drawn in front of (or above) any filled areas or images. So effectively there are two 'drawing order' lists. Always at the back (drawn first) are area fills and images and with this feature you can control the order of these. Always in front of these are all other entities where you can also control the drawing order in the same way.
PANNING
If you click and hold down the middle mouse button at any time, you can grab and move the page in order to get a better view. Release the middle mouse button once you're happy with the position of the page.
ZOOMING
Unlike other software packages, the scroll wheel does not scroll up and down the page but can be used to zoom in and out. Scrolling the scroll wheel upwards zooms in and scrolling the scroll wheel downwards zooms out.
What can I do with the Right Mouse Button?
CANCEL A COMMAND
When you want to stop or abort the current command you can click the right mouse button. Fore more information see Cancel a Command.
REPEATING THE LAST ACTION
You can also click the right mouse button to repeat your last action. For example, if you have just drawn a circle, you can draw another circle by clicking the right mouse button.
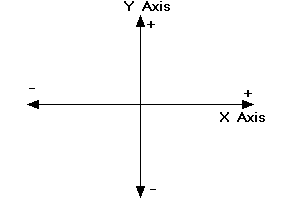
USING X AND Y COORDINATE MODES
In order to accurately place items on the page, X-Y Coordinate mode must be switched on by pressing the
 on your keyboard.
When in X-Y Coordinate mode, Draft it is set up like a graph with X and Y coordinates (see diagram below). The origin is located at the bottom left corner of the page. When placing an item on a page, the X coordinate defines its position along the horizontal plane/axis. The Y coordinate defines its position along the vertical plane/axis.
You can use X and Y coordinates to accurately place the start point of an item, such as a line. You may also use X and Y coordinates to place subsequent points of an item, relative to the previously defined point. For more information see X, Y Input.
USING SNAP AND NEAREST SNAP MODES
SNAP POINTS
You can draw items without using X and Y coordinates. Instead you can snap items you are drawing onto existing items.
You must first ensure you are in Snap mode by pressing the Snap button
 or pressing the
 key on your keyboard.
The different snap point options are indicated by different symbols. For example
 means End point,
 means Centre point.
For more information see Snap.
USING THE KEYBOARD ARROW KEYS
The keyboard arrow keys offer a simple way of specifying distance and direction.
When drawing an entity or using one of the modify commands and the system requires a second or subsequent point to be input,
simply press one of the arrow keys


 to specify the direction required and then type in the distance value.