
Draft it Help System
The complete Help system for Draft it is available on these pages.
Available in: Plus, PRO & Architectural
Select the Layer command
 to display the following dialog box.
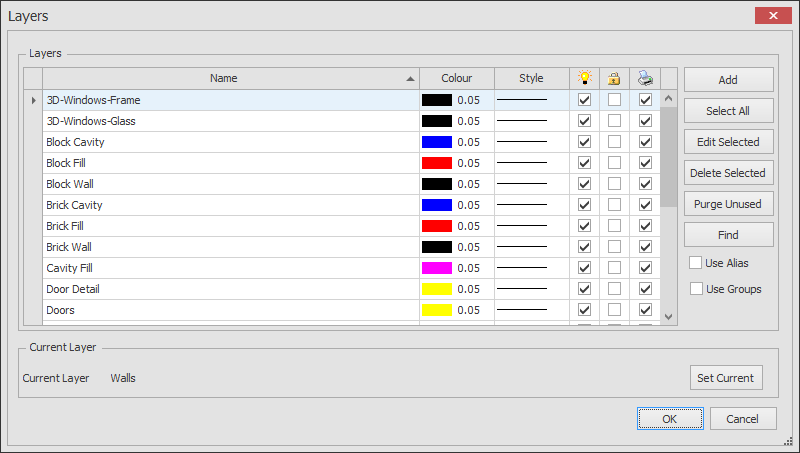
The list can ordered by clicking on any of the heading buttons:-
 ,
,
For example clicking on the 'Name' heading to sort the list alphanumerically by layer name, click it again to invert the list. Click on 'Colour' to sort the list by colour order.
Changing Layer Properties
All of the layer properties displayed in the list can be modified without using the 'Edit' button on the right of the dialog box. Simply click on the item to change. i.e
in the picture above clicking on the check box in the
 column on the 'Block Fill' Layer would move the blue highlight bar to that layer and would un-tick the box (turning the layer OFF). Similarly clicking on the black rectangle in the
 column on the 'Block Wall' layer would display the colour palette allowing a new colour to be set. The layer name can also be changed.
Click on the name to change which will move the blue highlight bar to that layer, then click again and the text will highlight allowing the name to be overwritten/modified as required.
column on the 'Block Wall' layer would display the colour palette allowing a new colour to be set. The layer name can also be changed.
Click on the name to change which will move the blue highlight bar to that layer, then click again and the text will highlight allowing the name to be overwritten/modified as required.
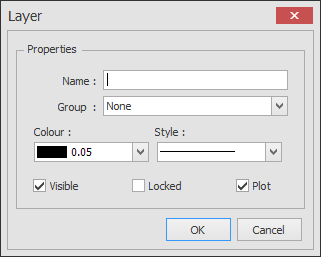
Add
Select the 'Add' button to display the following dialog box.

Click in the 'Name' field to alter the Layer name.
To change the layer colour click on the colour currently set to display the follow colour select box. The drop down box allows the selection to made from any of the available Pens.
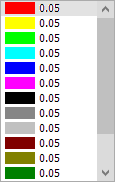
Click on the colour required to select or anywhere outside of the list to cancel.
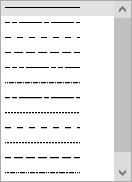
To change the layer Line Style click on the Style drop down list to display the following selection box.
Click on the style required to select or anywhere outside of the list to cancel.
The visibility of the layer can be turned OFF and ON with the 'Visible' check box.
The 'Plot' check box can be turned OFF or ON allowing the layer to be included or excluded from prints or plots
If ticked (ON) the 'Locked' check box locks the layer so that no entity on that layer can be modified in anyway until the box is unchecked (OFF).
You can edit multiple layers in the list by clicking in combination with the
 &
&
 keyboard keys.
Edit Selected
This button opens up the 'Edit Layer' dialog box. This box has the same layout and parameters as the 'Add Layer' box above and can be modified in the same way.
Delete Selected
This button can then be used to delete a layer. A layer must be empty before it can be deleted i.e all of the entities must either be moved to another layer or deleted prior to selecting this option. The 'Current' layer cannot be deleted even it is empty, also a Draft it drawing must contain at least ONE layer, therefore if there is only one layer it cannot be deleted. An appropriate error message will displayed if the selected layer cannot be deleted.
Purge Unused
This command deletes any unused layers from the layer list. A message appears to verify your selection.
Find
When selected the following search box appears at the top of the layer dialog box.

Enter the text to search through the layer names for. Your search cannot include spaces, if you enter a space in the search it is assumed that is the end if the search string. Click 'Find' to search and 'Clear' to reset the search. Click on the 'x' to left of the search box to close the 'Find' function.
Use Alias
The Alias function adds another column to the layer list, the alias column. This is particularly useful when working on imported drawings with lots of layers, you can assign a more descriptive alias to any layer you wish for easier identification,
Use Groups
Layer grouping is an alternative method of layer organisation and is particularly useful for drawings with lots of layers. You can organise layers logically into groups and group branches within the layer dialog box can be expanded and collapsed as required for easier navigation.
Switch on the 'Use Groups' function and the layer dialog box changes.
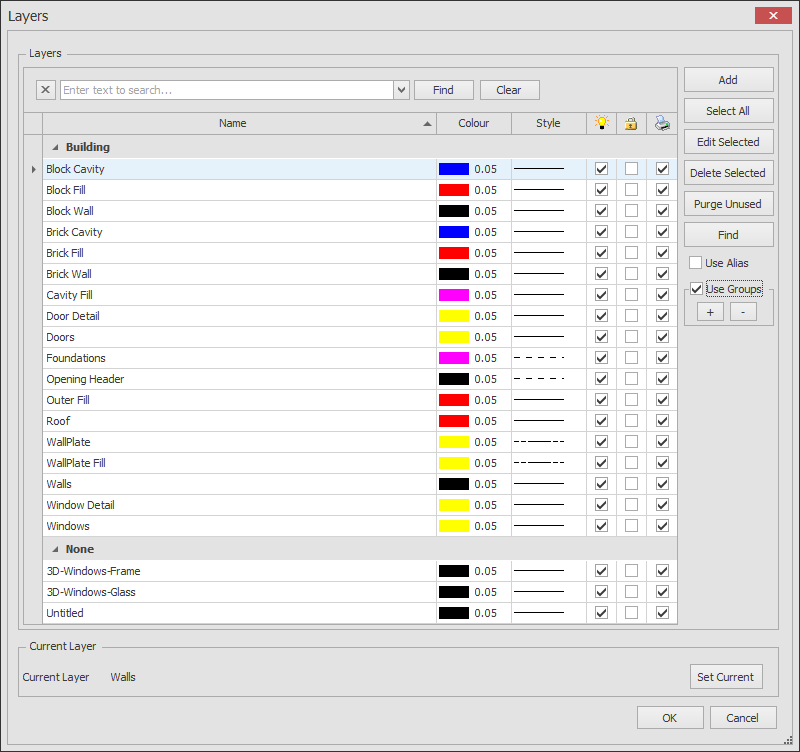
By default Draft it will put the 'Untitled' and any user created groups in a group called 'None'. The example above contains standard Draft it Architectural layers which by default are added to a 'Building' group. Underneath the 'Use Groups' option two further buttons are added, these are used to expand and collapse all of the group branches. When the function is switched on the Add//Edit Layer Box described previously is updated to include a 'group' setting' for each layer as shown below.
To edit the group of a layer simply click and select from the list or type a new name to create a group.
Set Current
This button makes the selected layer the current drawing layer and displays the layer name at the bottom of the dialog box. This layer name will be displayed in the 'Layer' field of the if the changes to the layer settings are confirmed by selecting the 'OK' button.
OK
Select this button to save all of the changes to the layer settings.
Cancel
Select this button to cancel any of the changes to the layer settings.
The 'Untitled' Layer
All Draft it drawings contain a default layer named 'Untitled'. This layer cannot be deleted. In addition to this anything drawn on the 'Untitled' layer within a Symbol appears on the layer the symbol is set to when it is inserted into another drawing.