Product Documentation
Draft it Help
Select the category below to quickly find the help you need.

Available in: FREE, Plus, Pro and Architectural
Click on the
 button to create a chamfer between two lines. If any entities are already in the Selection Set
they are deselected and the prompt reads:
button to create a chamfer between two lines. If any entities are already in the Selection Set
they are deselected and the prompt reads:
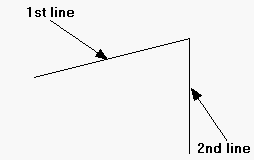
Give First Line To Chamfer:
Select the first line which is changed to the highlight style and the prompt reads:
Give Second Line To Chamfer:
Select the second line which is changed to the highlight style and the prompt reads:
Give First Chamfer Size:
Now a dynamic line representing the chamfer moves in conjunction with the cursor. Draft it requires a distance along each of the two lines to be input to create the chamfer. These distances can be entered in any order i.e it doesn't matter which entity was selected first, the position of the cursor controls the entity to which the distance will be applied.
The Snaps and Input Options
change now displays additional options depending on previous use to either of the following.


In the example here the 'Distance' option is selected. If 'Snap' was selected the dynamic dimension would not be displayed.

The system toolbar now displays additional options depending on previous use to either of the following.
You can change between the 'Snap' and 'Distance' buttons as required. If 'Snap' is selected any of the system
Snaps can be used to specify the chamfer point.
If 'Distance' is set the system displays a dynamic linear dimension from the intersection point of the lines to the nearest perpendicular position on either of the two lines,
click in the drawing area to accept the current value. (The increment of the dynamic dimension is controlled by the Linear 'Cursor increment' settings in the
Units settings.)
You can type the chamfer size directly into the distance input box and the dynamic linear dimension will be frozen to reflect this value. Click anywhere in the drawing area to accept this value or click the
 locked button to release the dimension.
After selecting the first chamfer size the prompt reads:
Give Second Chamfer Size:
The above input options are available for selection of the second chamfer value, obviously at this point the position of the proposed chamfer is fixed on one of the lines and the cursor position is defining the position (perpendicular) on the other line.
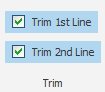
After defining the sizes the chamfer will be drawn with the lines trimmed depending on the setting of the 'Trim 1st Line' and 'Trim 2nd Line' options in the Ribbon (see below). The default setting for both is ON.

The easiest way to achieve a 45º chamfer is to selected the two lines, then select the 'Distance' option on the system toolbar.
For the first chamfer distance type the required into the input box. As soon as you start to type the lock/unlock button will lock
.
Click in the once in the drawing area to accept the value for the first size and click again to accept the value for the second size.
Any questions?
Perhaps you need help deciding which of our CAD systems is right for you, or maybe you need to chat with us about our bespoke development service.
Don’t hesitate to get in touch. The Draft it team is dedicated to ensuring you get the best design experience on the market. Whatever you need - call us, email us – we’re here to help.
 +44 1543 419 886
 enquiries@cadlogic.com
 Postal Address Details