Product Documentation
Draft it Help
Select the category below to quickly find the help you need.

Available in: FREE, Plus, PRO & Architectural
Lets add the 12mm hole geometry to the side elevation.
We will use the Offset command to add the lines but first select the 'Style' in the status bar and change the line style to 'Hidden' (dashed).
Simply click on the arrow on the style field and from the list pick the 'Hidden' line style.
Now select Units from the Settings Group on the Views & Settings Ribbon Page and set the 'Linear' 'Cursor Increment' to '1.00', then click 'OK'.
Select the Offset button
 and the prompt reads:
Give Line/Arc/Circle to Offset:
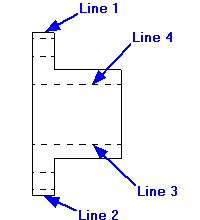
Select the 'Line 1' shown in the diagram and the prompt now reads:
Give Point to Offset To:
Move the cursor down below this line and regardless of the current Input Option just type '4' and press enter. The Direct Input feature accepts the input as the required offset and the command is complete.
Select the Offset button
again or press to repeat the command.
Select the 'Line 1' once more and click another line into place 16mm below 'Line 1'.
Repeat the above process to create two more lines representing the lower 12mm hole placing them 4mm and 16mm above 'Line 2'.
Click on 'Line 3' so that its Entity Handles are displayed. Now hold down the
 key and click on 'Line 4'.
Both of these lines should now be selected. Now click on the arrow on the 'Style' in the status bar and from the
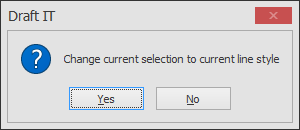
list pick the 'Hidden' line style. Draft it ask you to confirm that you wish to change the line style of the current selection, click on 'Yes'.
key and click on 'Line 4'.
Both of these lines should now be selected. Now click on the arrow on the 'Style' in the status bar and from the
list pick the 'Hidden' line style. Draft it ask you to confirm that you wish to change the line style of the current selection, click on 'Yes'.
The side elevation should now look as follows.
Any questions?
Perhaps you need help deciding which of our CAD systems is right for you, or maybe you need to chat with us about our bespoke development service.
Don’t hesitate to get in touch. The Draft it team is dedicated to ensuring you get the best design experience on the market. Whatever you need - call us, email us – we’re here to help.
 +44 1543 419 886
 enquiries@cadlogic.com
 Postal Address Details