Product Documentation
Draft it Help
Select the category below to quickly find the help you need.

Available in: FREE, Plus, Pro Architectural
There two methods of drawing an arc with this command, 'Centre, Start & End' and '3 Points'. Draft it remembers the last method used.
The default method is 'Centre, Start & End', select the 'Draw Arc' button
 and the command prompt reads:
Give Centre Point / (T)hree Point Arc:
Select the centre point of the arc using any of the snaps and input options.
After selecting the point a dynamic line is drawn from it to the cursor. This line is defining the radius of the arc and a dynamic circle is drawn around the centre point through the cursor position allowing you to visualise the size of the arc. The prompt now reads:
Give Start Point:
Select the start point of the arc using any of the snaps and input options.
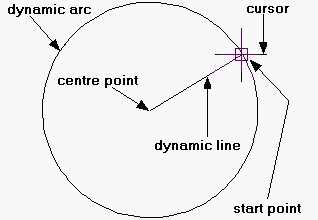
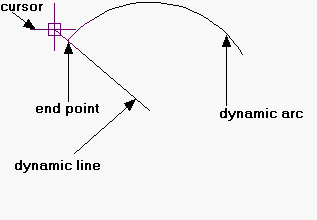
After selecting the point the dynamic line continues to be drawn from the centre point to the cursor. However the radius and the start angle of the arc are now fixed. As you move the cursor a dynamic arc is drawn in an anti-clockwise direction from the start point around the centre point to the cursor.
The prompt now reads:
Give End Point:
Select the end point of the arc using any of the snaps and input options. The arc is now drawn.
To draw a three point arc select the 'Draw Arc' button
and the command prompt reads:
Give Centre Point / (T)hree Point Arc:
Type and the prompt now reads:
Give Start Point / (Centre):
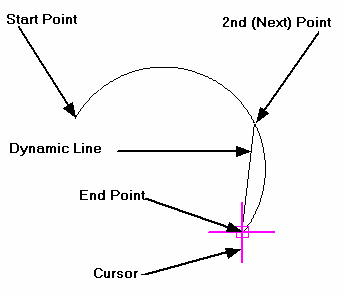
Select the start point of the arc using any of the snaps and input options. After selecting the point a dynamic line is drawn from it to the cursor.
The prompt now reads:
Give Next Point:
Select the next point of the arc using any of the snaps and input options. The arc to be drawn is now dynamically drawn from the 'Start Point' through the point just picked to the cursor.
The prompt now reads:
Give End Point:
Select the end point of the arc using any of the snaps and input options. The arc is now drawn.
To switch between the two arc types, type in either or
as required after selecting the 'Draw Arc' button
.
or
as required after selecting the 'Draw Arc' button
.
Any questions?
Perhaps you need help deciding which of our CAD systems is right for you, or maybe you need to chat with us about our bespoke development service.
Don’t hesitate to get in touch. The Draft it team is dedicated to ensuring you get the best design experience on the market. Whatever you need - call us, email us – we’re here to help.
 +44 1543 419 886
 enquiries@cadlogic.com
 Postal Address Details