Product Documentation
Draft it HelpSelect the category below to quickly find the help you need.

Available in: FREE, Plus, Pro Architectural
Selecting items within Draft it is a straightforward process. Single and multiple selections are possible and items can be added to and removed from the current 'selection set' (see below).
Selection Set
The Selection Set is defined as the items currently selected. The line style of these items will be temporarily changed to a dashed style (highlight style) and the entity handles will be displayed providing the Entity Selection Limit for Handle Display has not been exceeded.
Selecting a single item
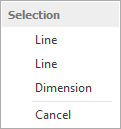
Simply left click on the required item when the cursor is placed over it. The display of the selected item is then changed to the highlight style. Clicking on another item will clear the current 'selection set' and select the new item clicked. If more than one item is found near to the cursor then the system will display a pop up list of the items found within the search tolerance (see the image below). Here the system has found 2 lines and a dimension, moving the cursor over any of the menu choices in the list highlights the associated entity on the drawing. Click to accept the required entity or click cancel.
Clearing the selection set
The 'selection set' is cleared by executing a left mouse click in a clear area of the drawing.
Selecting items within a box

To select items within a rectangular box requires two opposing corners of an imaginary box to be indicated within the drawing area. Simply click and hold down the mouse button to indicate the first point of the box, a rectangle will then dynamically follow the cursor as it is moved. (If moved to the right a solid (window) box will be displayed, to the left a dotted (crossing) box is shown.) Release the mouse button at the opposing corner to define the box.
The items selected by the box will depend upon whether the box was solid (window) or dotted (crossing). If solid then only items completely within the window box will be selected, if dotted then any item passing through the crossing box in whole or in part will be selected.
The picture here shows the affect of using the different types of selection box. The selection areas are the same size and relative position but because the points are picked differently you will see in window selection box that only the left vertical line and the two left most circles are highlighted. However on the crossing selection box more entities are highlighted because any items passing through the box are selected.
Selection Set - adding and removing items
The shift key and control key keyboard buttons can be used to add and remove items from the selection set.
Holding down the shift key always adds items to the selection set. .i.e. Holding down shift key and clicking on an item adds that item to the selection, if the item is already selected, nothing changes. If selecting items within a box then any not already picked are added, whilst previously selected items are retained.
Holding down the control key always toggles items in to or out of the selection set. i.e. Holding down control key and clicking on an item adds it to the selection if the item is not already picked, otherwise if already selected the item is removed. If selecting items within a box then any items not already picked are added, whilst previously selected items are removed.
Any questions?
Perhaps you need help deciding which of our CAD systems is right for you, or maybe you need to chat with us about our bespoke development service.
Don’t hesitate to get in touch. The Draft it team is dedicated to ensuring you get the best design experience on the market. Whatever you need - call us, email us – we’re here to help.
 +44 1543 419 886
 enquiries@cadlogic.com
 Postal Address Details