Product Documentation
Draft it Help
Select the category below to quickly find the help you need.

Available in: FREE, Plus, Pro Architectural
When a single arc is selected its entity handles are displayed. Once you have selected the arc the editing choices are to either Delete, modify the properties using the Properties Explorer or the Ribbon, or to move one of the entity handles.
An arc has three entity handles, one at each end (blue) and one at its centre (red). Move the cursor over any of the handles and its colour
changes to yellow then simply click to select it. If selected the major handle (red) attaches the whole arc to the cursor allowing it to be moved
to a new position and clicked into place using any of the snaps
and input options. (Alternatively select the
 Move command.) The minor handles at the
endpoint's define the start and end angle of the arc. If one is selected it is attached to the cursor and moves with it changing the angle of that end as well
as the radius, the other minor handle remains in place. The endpoint selected can be moved to a new position and clicked into place using
any of the snaps and input options.
Move command.) The minor handles at the
endpoint's define the start and end angle of the arc. If one is selected it is attached to the cursor and moves with it changing the angle of that end as well
as the radius, the other minor handle remains in place. The endpoint selected can be moved to a new position and clicked into place using
any of the snaps and input options.
If the arc was drawn using the
 Circle button then when selected
the start and end angle points are coincident. Clicking on the coincident handles will select the endpoint first as that point was added to the
drawing after the start point and was therefore drawn on top.
Circle button then when selected
the start and end angle points are coincident. Clicking on the coincident handles will select the endpoint first as that point was added to the
drawing after the start point and was therefore drawn on top.
In addition to the above when a Arc is selected further editing options are available (below) when the middle mouse button (wheel) is pressed.
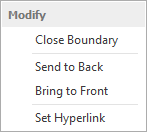
Send to Back/Front - Use these options to move the Arc backwards or forwards in the drawing order.
This is useful when trying to position the Arc in front of or behind other entities.
Set Hyperlink - A Hyperlink can be added to the Arc. When selected use the dialog box that appears to set the required URL/link.
Any questions?
Perhaps you need help deciding which of our CAD systems is right for you, or maybe you need to chat with us about our bespoke development service.
Don’t hesitate to get in touch. The Draft it team is dedicated to ensuring you get the best design experience on the market. Whatever you need - call us, email us – we’re here to help.
 +44 1543 419 886
 enquiries@cadlogic.com
 Postal Address Details